Dropping the ball!!!
Dear Andy, as a child born of the British Empire, and as one whose last seventy years have been filled with love and devotion for MY QUEEN, I have sat glued to the telly for the past four days, totally enthralled by the pomp and ceremony that only the British can produce. So I cannot believe that the MGCC on such a prestigious occasion should drop the ball! What were they thinking? MGs were involved at the London Olympics, so why not here?
Rather than a mixture of Morris Minors and some dubious and unreliable Jags with Hags, and silly Sinclair scooters…even a Reliant Robin, surely the organisers should have been encouraged to understand that the ONLY vehicle to LEAD such a parade, was a tiny black MG TC driven by a young naval officer representing Prince Philip and a beautiful young lady representing the young Princess Elizabeth! So who dropped the ball?
This was undoubtedly the best possible PR stunt that the club could have ever pulled off. Added to that was the fact that although a million Morris Minors were sold…it is an accepted FACT that it was the products of Abingdon that led the great “export or die” drive into the USA, that ensured that same little MG model would be revered as the “Sports Car America loved First”…and instead of dozens of them in the Queen’s Platinum Parade…there was not one! What a tragedy…time for a marmalade sandwich anyone? We really must do better.
Octagonally, Norman Ewing
Stars of Sandstone Newsletter
Download publicationSandstone Heritage Trust's motto is “Preserving the best of our past for the future”, and at Stars of Sandstone 2017, visitors will be able to immerse themselves in a world that steps away from the pressures of modern life.
Lap of Natal
The recce for the Lap of Natal is now complete.
Due to the state of some roads we had to make various changes to the route and also a couple of the accommodation spots were not up to scratch.
There is a bit of gravel road around the Battlefields, a bit to get into a couple of hotels but all in all some good driving roads.
Day 1 has a change of route to Dundee via Balfour and Standerton as the first options is a race track for hundreds of coal trucks.
Day 2 is the Battlefield tour and we found a very interesting road through to Ladysmith which doesn’t really show up on Garmin or T4A. The overnight is changed to the Mont Aux Sources hotel in the heart of the Berg. Stunning views.
Day 3 is where we had two routes, a shorter via gravel and a longer on tar. Some of these roads have deteriorated to such an extent that they are just not do able. We therefore ended up with one route which takes us down to Estcourt and then through the Kamberg district and on down the Midlands Meander from where we head off to our overnight stop via Underberg. Here we get to the most Western point of KZN accessible by road.
Day 4 we head down to the most Southern point of KZN taking in a very interesting drive from Izingolweni to Port Edward. We then head north up the lower south coast old road to Port Shepstone and into Oribi Gorge where we overnight. It is a relatively short day and you will have time to explore the Gorge in the afternoon.
Day 5 is a short run up to Durban along the old coast road.
Day 6 is a day off in Durban. (To find the perfect curry!)
Day 7 we trace the route of the Comrades Marathon up to Pietermaritzburg and then on to a stop at Howick Falls. From Howick we head out of town and take a short gravel road through a splendid forest to Albert Falls Dam and then head towards the coast via New Hanover to end up in Salt Rock for an overnight. The rooms overlooking the Indian Ocean are stunning.
Day 8 we head north up the N2 highway and head up to the capitol of KZN, Ulundi, and then head into the Imfolozi Game Reserve. I was able to obtain to use soft top cars in the park as long as the roof is up. The official route takes us out of the park half way up and down to our overnight at St Lucia but you have plenty of time in the park to do more if you wish.
Day 9 is basically a day off with an organised boat cruise into the St Lucia Estuary. I also recommend a run up the coast to Cape Vidal.
Day 10 is a run up to the most Northern and Eastern point in KZN at the Mocambique border then a run across to our last night stop at a very splendid hotel on Jozini Dam. There will be a booze cruise on the dam in the afternoon followed by our tradition last supper together.
Day 11 head back for home.
The distance for the event is close to 3500km with the longest day being the return home from Jozini Dam at 520km.
The entry fee is R17777.77 for two people. Included is/are:
All accommodation.
All Breakfasts and Dinners except for the two nights in Durban where I shall be in search of the perfect curry.
Entrance fees to Talana Museum, Blood River, Isandalwana, Rourkes Drift, Oribi Gorge, Umfolozi Nature Reserve, St Lucia River Cruise and a Jozini Dam Cruise.
A Battlefield Tour Guide Expert.
A rally plate and decals.
Route Instructions via GPS and Print.
A farewell Dinner and prize giving.
A huge amount of fun if the last few events are anything to go by.
This works out at R1600.00 per day per couple all in except two meals which in this day and age is very acceptable
Entry is limited to cars which are 25years old or older.
The event requires 10 entries to make it viable and is limited to 17 entries. Entries open immediately and close the 30th July 2015. A payment of R1000.00 is required to make a booking and is not refundable after the 1st June 2015. The balance of payment date is the 30th July 2015.
Contact: Roger Pearce 0117872829 or 0828970771
Scams
I have to admit that I was naive enough to be caught in a scam. Had I not had some other MGCC members (I won’t embarrass them by sharing their names) share similar stories with me I probably would not have admitted to this.
There have been a number of these scams and the modus operandi of the guy or guys is like this- I list these to highlight the dangers :
I placed an advert in Junkmail in the wanted section for some MG parts and had a call from a chap who said he had all the items I was looking for and for a small amount of money- delivery cost only until I was happy, would deliver them to me over a long weekend, needless to say, after I EFT’d the cash into his account he gave me a string of lies. He gave his name as Johan Pienaar from 26 Vermaak Street Smithfield in the Free State – cell 071 903 0715. Hi bank account number 62079943116 code 230 436 checked out although the bank was reluctant give any more details. This chap comes up often with different names and now has an account with Capitec as well.
Shortly after this another club member phoned to tell me that he had placed a wanted advert in Junkmail for some Austin Healey bits and was very happy to report that a chap from Smithfield had phone him and had all these parts. Armed with my warning he strung the guy along and was about to travel down to the Cape and suggested that he call in and see the parts. All communications ceased abruptly.
I scan the various ‘for sale’ adverts on Gumtree, OLX and Junkmail from time to time and every now and again I follow up on one and here is another MO:
An advert came up with pictures of very nice looking MGB’s came up. What was strange, but not all that unusual, was that the registration numbers had been blacked out. I phoned and got through to a chap who said he was in Kimberly (notice all the places are in the sticks!). His story was that he is a priest (honest!) and he had contacts with a transport company that would deliver to Johannes burg and all those nice things but obviously only after the funds were received and cleared etc. This chap has scammed a member of the Natal MGCC and has as recently as last week attempted to scam a CC member in Randburg with the offer of an MGA Coupe.
This weekend an advert for an Austin Healey came up. There are a number of pictures showing a very nice looking car in front of some hangar doors but with an unrealistically low price of R 90,000,00. The registration numbers are blanked out and the car is a LHD. Google has a facility of tracking an image and when Michael did this (he is hankering after an AH!) up comes the same car in a American advert for $25000,00. The chap made some other mistakes in the advert- The Google maps showed the location as Upinton and the advert listed the location in Southrand.
I have had some responses to a wanted add in our very own MGCC website from as far afield as Kansas USA and Belgium that I suspect are scams.
We are not alone with this type of scam with classic cars. John James who writes the Totally T Type2 article every month reported that a chap in Europe was tracked down and sentenced to 4 years for such a scam. I can recommend that everyone with a T Type gets onto his mailing list.
Please everyone if the deal looks too good to be true it probably is. The MGCC (locally and worldwide) has a network of genuine guys who would happily check out any such advert. In fact Cliff Smyth gave me the name of his friend who lives in Smithfield to check Pienaar out
Regards
Bruce Dixon
The Leak free engine
British cars and motorcycles have always been know to leak oil from their engines, especially the BMC, Jaguar, Triumph etc . . It's a "Tradition" some may say.
There are those who accept the oil stain on the garage floor as "part of the deal" and simply put a tray under the car,.... then there are others who prefer to find solutions. Unfortunately, the solution to this problem is not a simple quick fix, but could be tedious and expensive.
Common causes of a engine oil leak are:
Inferior or incorrect gaskets fitted, or just poor engine assembly.
Worn oil seals, or poorly fitted.
More common causes of persistent oil leak is from worn rings, which allows compression to leak into the crankcase building a positive pressure.
Blocked crankcase vent tube as fitted to earlier small bore motors
Blocked Pressure Control Valve (PCV) fitted to some cars.
Then of course there is the design of the B Series engines. They have no rear main oil seal and rely on a counter rotating oil grove cut into the crank to prevent oil escaping, unfortunately, with today's light oils, this "tolerance"seal just does not work.
It is my opinion that the main cause of oil leaks on British Leyland engines (assuming the engine was correctly assembled) is caused by the inability to create a negative pressure in the crankcase, like all engines it builds up a positive pressure in the crankcase which is responsible for pushing the oil out the rear main bearing ..over the years BMC tried numerous methods to rectify the situation, including:
Trying to decrease the crankcase pressure by venting via the inlet manifold, all very good when the throttle is closed at idle, but there is no negative pressure in the inlet manifold when the throttle is opened... when it is needed most.
Venting the crankcase pressure to atmosphere via breather pipe fitted to the timing chain cover, or to the cam followers inspection panels. Unfortunately, whilst this will neutralize the pressure it does not create a negative pressure.
And by fitting a PCV to some cars, also ducted via the inlet manifold
I did a experiment to see what happens when a negative pressure is created in the sump... By fitting the inlet side (suction side) of a 12 volt air pump (the ones used to pump up an inflatable mattress) which was switched on during normal driving.. guess what, it worked perfectly. Unfortunately it is not a practice solution, for obvious reasons. But it proves that by creating a negative pressure in the engine it does solve the problem.
So, how can we practically create negative pressure in the engine?
The problem was addressed by BMC by fitting a vent tube to some models that was directed into the airstream under the car, the end of the tube was cut at a 45 degree angle, which caused a vacuum when driving at speed, but did nothing when there was not much forward motion. .. Problem half solved.
A very effective modification to this solution would be to build a simple Venturi to the end of the breather (remember the Piper aircraft? .. A Venturi was used to drive the air speed indicator and other instruments) .. This system does work, but then again it is only effective at speed.
The answer would be to fit a small 12volt vacuum pump to the end of the vent tube found on the tappet cover. Anyone tried this ?
Many attempts have been made to fit a rear main oil seal (only a split seal can be fitted (Ford have used these) it will certainly solve our problem ... Has anyone had any success with this, and has anyone tried to use or make a leather seal? ... Leather has been use in diff and gearbox seals by Jaguar and others, I have used them successfully.
Boytjie
Heart to Heart
 Download article
John Meiring while making a point at the 7th Nov '13 noggin. His talk was entitled "heart to heart" & was about his heart attack & the lessons learnt - which John was very keen that others learn without having to go through all the pain.
Blast from the past with new kid on the MG block
DMembers of the MG Car Club Johannesburg were treated to a sneak preview and a taste of the latest offering from the British company while taking a relaxing drive in their classic MGs of which some date back to the early post-war years in Europe.
More than 20 MGs from the early 1950s up to the most recent roadsters gathered at the MG South Africa head-office in Randburg recently (on Sunday 10 November) for the club’s annual Christmas Run – a leisurely drive along some exciting country roads along the so-called Magaliesburg Meander on the Gauteng West Rand.
The event started with a gathering from the MG / Maxus head-offices in North Riding where the 20-odd club members – mostly couples – enjoyed traditional mince pies and other snacks.
MG South Africa General Manager Derrick Bishop welcomed the group and surprised them with the unveiling of two versions of the exciting new MG3, which will officially be launched through the MG SA national dealership network in early February 2014. The new MG3, which was designed and developed in the UK and Europe, but built by MG’s new Chinese parent company in China, was recently unveiled at the Johannesburg International Motor Show, where the car was extremely well received by South Africa’s top motoring scribes and the general public.
“MG has come a long way since my car was designed,” said Ken Duncan, proud owner of an impeccable 1952 version of the MG TD. And no, TD has no reference to the modern nomenclature for Turbo Diesel – it was merely the fourth generation of a 2-door soft top called the MG TA, TB etc.
“I bought her back in 1972 when we still lived in the then Rhodesia. Although I did a lot of work on the mechanics, the body is original and I haven’t touched her paintwork,” said Duncan, who also owns three other MGs.
Issued on behalf on MG South Africa by Outlook Africa.
Contact: Corinna Howard, 083 228 7182 or info@outlookafrica.co.za
The Twin S U's
Not sure who made the comment when referring to the SU carburettor....."I honestly don't understand why people need to continuously fiddle with them" …. There are many who share this view.
The SU gives excellent all round performance and economy, and of course they look good … lifting the bonnet of our British classic there simply has to be at least two SU's ... It just cannot be any other.
This is not intended to be another “how to tune your twin SU's” story, for that I would strongly recommend you purchase "the SU carburettor high-performance manual" by Des Hammill ....
The SU uses a simple constant velocity principle, ie the piston (or dashpot) is lifted by a vacuum created by the drop in air pressure when the throttle is opened... the tapered needle attached to the dashpot allows a measured fuel supply to enter the air stream via a fixed jet, a simple operation and simple to tune … If only a single carb is used... not so simple when we have "Twin SU's"
So, why do so many enthusiast continually strip and find it necessary to tune there “twin SU’s”?... The most common reason is because multiple carbs just don’t perform to their full potential if they are not SYNCHRONIZED
The challenge of synchronization is often overlooked and is not a simple fix. …. Because both pistons need to rise at exactly the same rate of climb for any given throttle settings, allowing the air flow to get both carbs to feed exactly the same recommended air/fuel ratio to all the cylinders for any given throttle setting. (from idle to full throttle).
To achieve this they have to Synchronized) .... Easy, well no!....
To achieve synchronization between the twin SU carb setup it is important to check the basics first:
Ensure that the piston and suction chamber are CLEAN (use spirits or petrol on a soft cloth).
Check that the needles are identical, not worn and fitted correctly.
Check that the piston springs are standard and the same (critical to get the pistons to ‘ride’ at the same height throughout the rev band)
Check spindle and linkage wear, (commonly overlooked) ... The mixture settings can not be set correctly if air is being leaked through the butterfly spindles.
Make absolutely sure that the fuel bowls (float chambers) volumes are identical, to do this accurately, run the fuel pump for a few seconds to make sure they are both full, remove the lid and measure the amount in each bowl by sucking it up with a syringe and measuring the volume. … Adjust accordingly.
Check the needle and seats in the float chamber, the slightest leak will cause flooding at idle, and upset the synchronization.
Then the piston and vacuum chamber of each carb have to be matched by doing "the drop test".... this is done by removing the vacuum chamber and the piston (do not mix them up), unscrew the dash pot and remove the needles. After cleaning, temporarily plug the drillings in the piston (normally two holes) with “presstick” … insert the piston (without the springs) into the upturned vacuum chamber, then turn right way up, allowing the piston to fall slowly from the chamber…. Measure the time it takes to drop out on both, (for the smaller 1 ½ , it should take about 5 to 7 seconds). The time taken should be the same in both drop tests … if not, try changing the pistons around. Let’s hope you are lucky. Unfortunately you cannot decrease the drop rate, but it is possible to increase the rate by lightly polishing the piston’s matching surface with Brasso… measure repeatedly and take care!
Ensure that the plastic stop is fitted into the piston base .. There should always be a minimum gap of about 3 to 5 mm between the base of the piston and the bridge of the carb body when the engine is not running.
Check the tension springs on all adjustment screws, the settings tend to change from vibration. (good idea to replace them)
The biggest challenge trying to synchronize the twin’s is to finely balance them individually at idle (with the linkages loosened) The standard manifolds have a “balance tube” connecting the two carbs, which means that all cylinders are robbing from the tube. Essentially, if the front carb is running rich/or lean it will affect the rear cylinders as well (because of this action “colourtune” cannot be accurate) ....and the firing order of the BMC motor (1,3,4,2,) also does not help.
We have heard of people who can ‘balance’ SU’s by fitting a tube into their ears and listening to the hiss…, hmmm yes OK, but it is just not possible to get it absolutely right, the use of an inexpensive vacuum gauge is a must ….. Nothing less will do.
There are of course some bad practices often used, like ....”just take the springs out, or even worse just stretch them” ..... or just put thin or thicker oil in the dash pot even worse no oil at all, etc.etc. …..Please, it just does not work like that.
Having checked all the above …Set the mixture correctly, and ensure that both carbs are drawing the same volume at idle (trust the gauge)… we have a nice steady idle, tighten the linkages, but before putting sae 20 oil into the dashpot, check the synchronization …by removing the dash pot and insert a piece of rolled paper or milk shake straw (8 mm dia) approximately 100mm long into the piston (dashpot hole) ….draw a simple scale, number 1 starting at the top ridge of the vacuum chamber (engine not running) and working down wards 5mm apart, for approximately 50 mm (ie 10 lines marked 1 to 10). …start the engine and both pitons should rise to the same level on your scale at idle, increase the RPM to 2,000 and again they have to be at the same, and so to for the entire rev range .. this will also allow you to check that both carbs are lifting at the same rate under acceleration by slowly increasing the RPM ….
Your SU’s are now synchronized, delivering the same fuel/air ratio over the full rev range, to all four cylinders, and you are guaranteed an increase of performance and economy.
The only thing that still needs attention is to determine which of the many needles will work on your engine, all needles measure the same at idle, but the trick is to get the mixture correct throughout the rev range …. That is “Another Story”
Boytjie
Broken Manhole Covers and Suspension Bolts
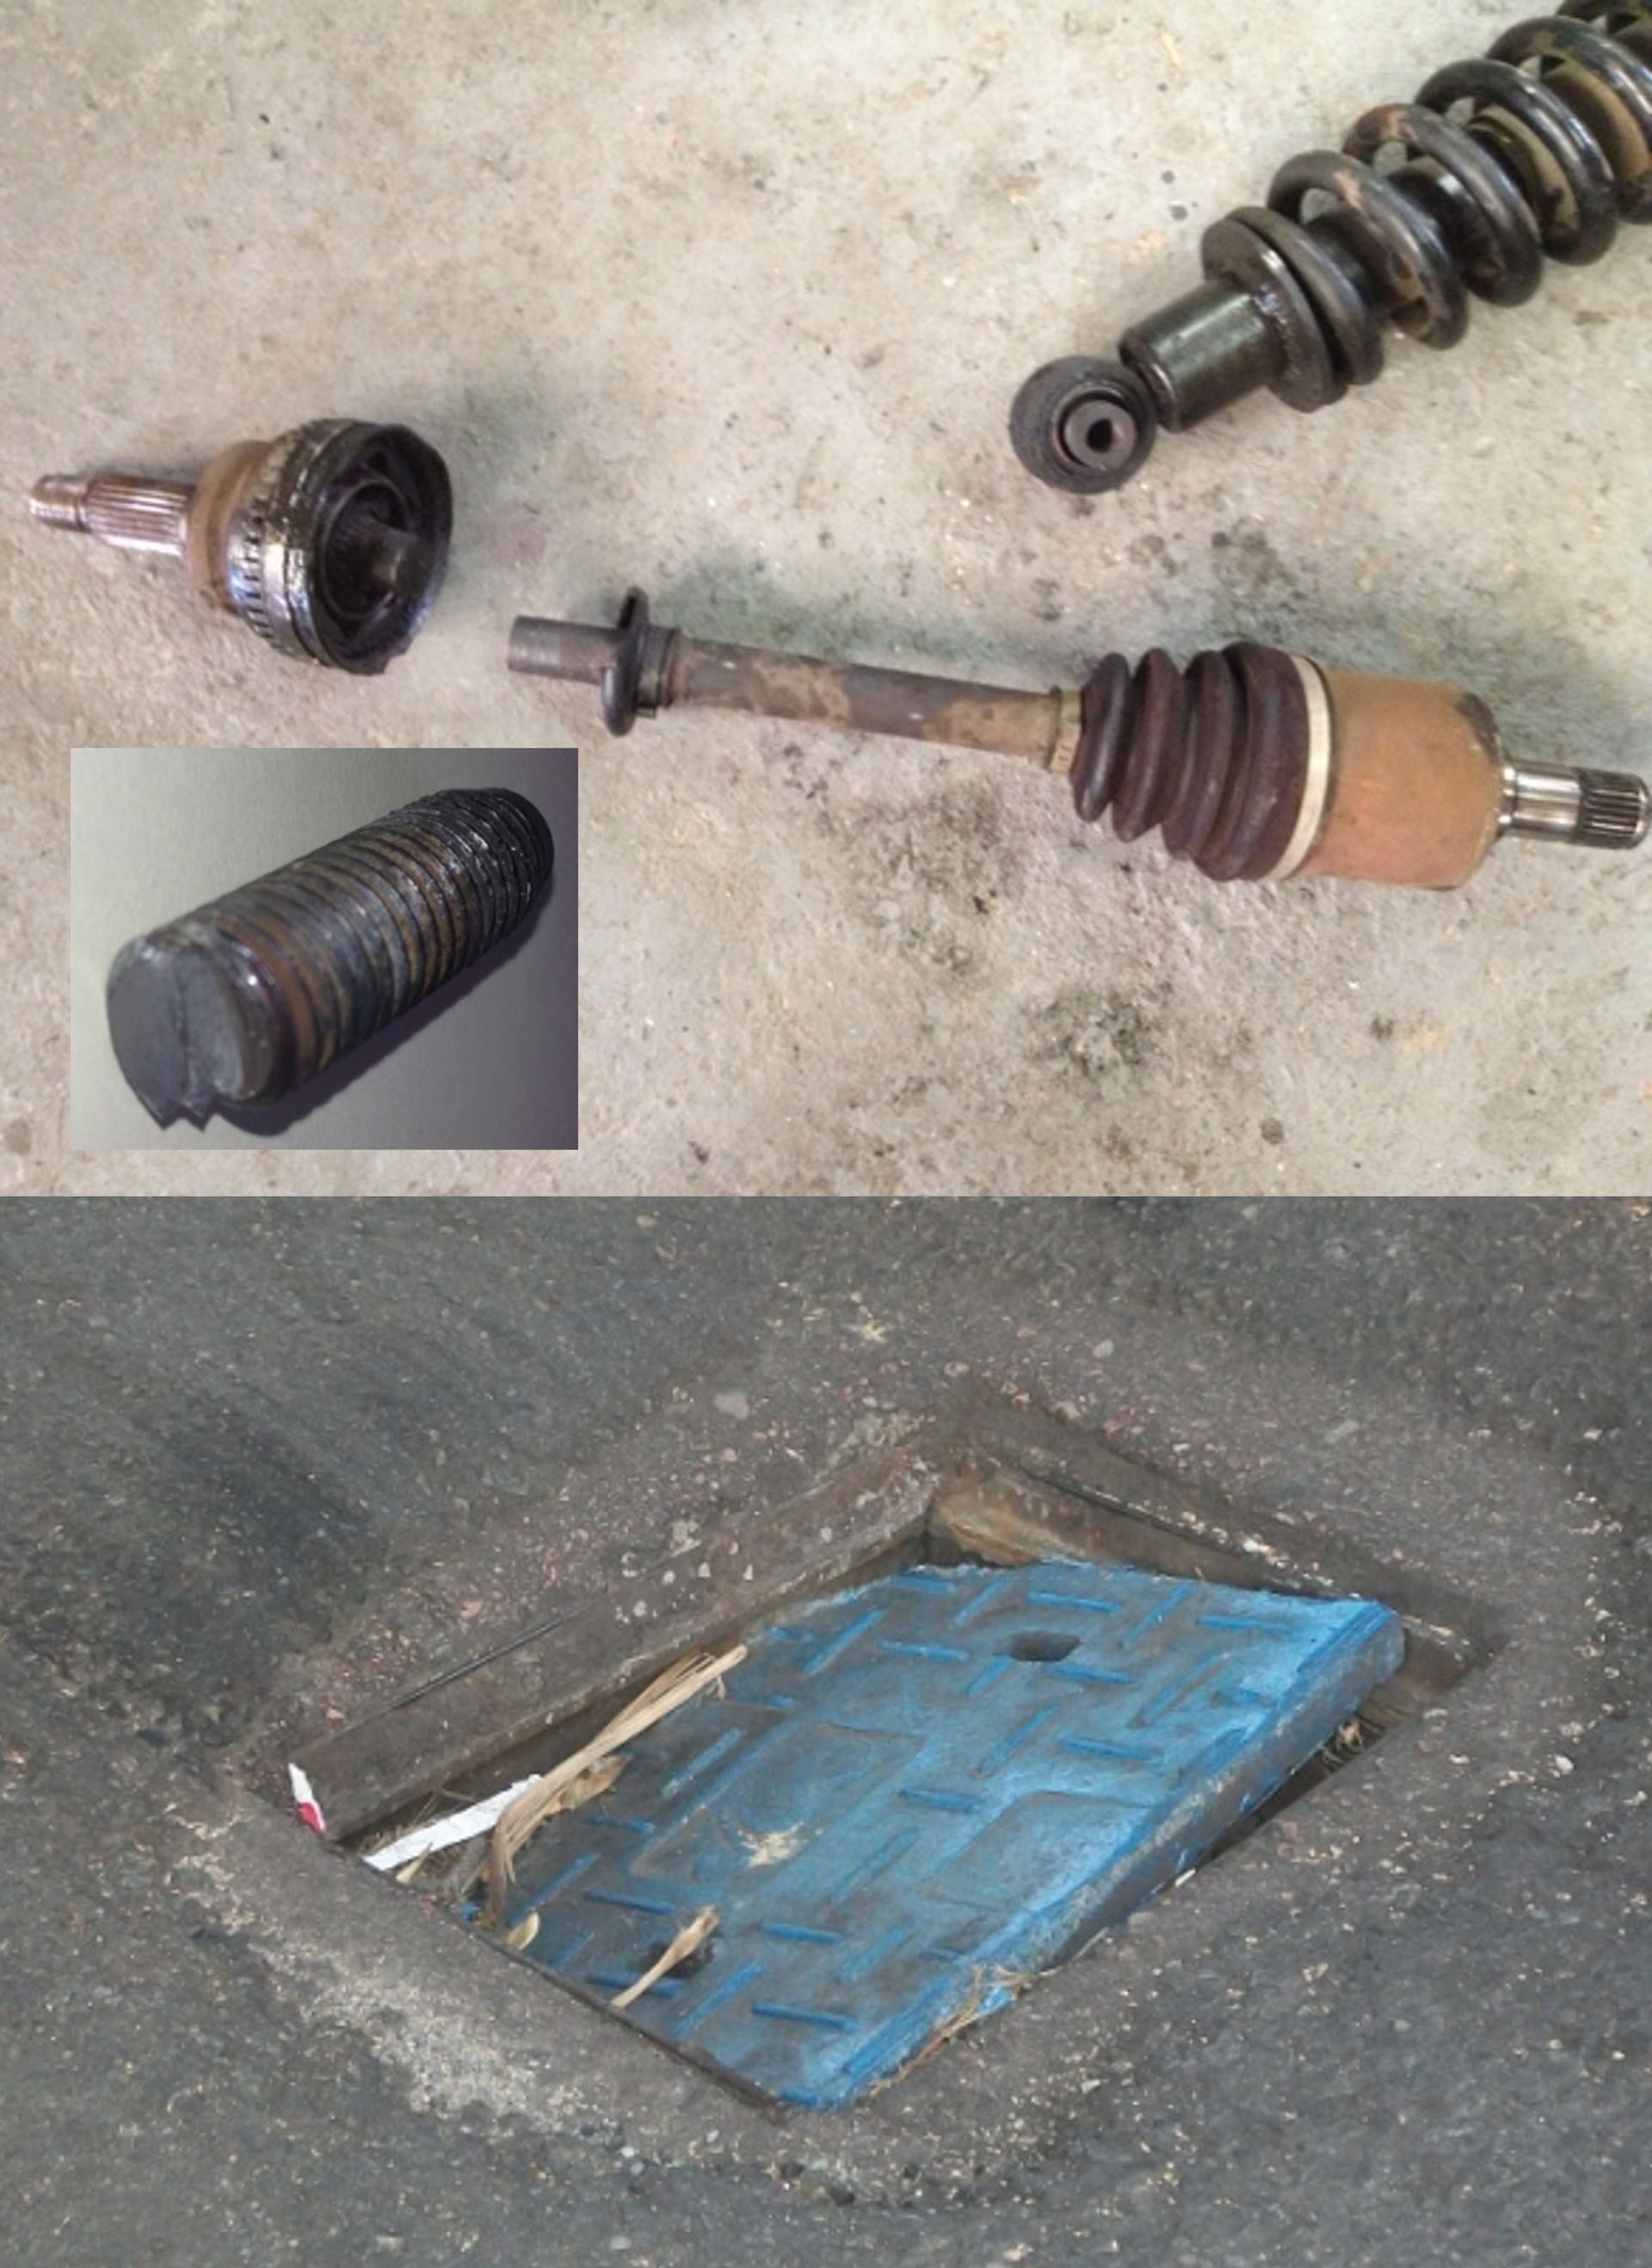
I believe my recent (and some past) experience should be shared with our members.
Norman wrote about suspension bolts breaking on the TF160's. There is a bolt that secures the lower end of the combined shock absorber and spring to the sprung section of the wheel hub. The bolt is cantilevered and therefore from a technical point is in single shear and being cantilevered is also subjected to bending. In my case the sheared line is at cut of the thread and not on the shoulder of the bolt. The 'v' of the thread appears to have been a crack inducer, rather like the perforations on toilet paper, and on microscopic examination there is some crystallization on the break. The crystallization would indicate fatigue resulting from repeated bending rather than a shear fracture. The impact was probably the last straw.
This failure has been experienced by a number of TF 160 drivers and all owners should be aware of it and know how to recognize it when it happens. Anyway Norman has covered this in his letter to the magazine. The purpose of this letter is to share my experience with claiming damages from the relevant authorities.
Apologies to the legal fraternity in the club who may not agree with my recommendations but what I can tell you is that my efforts worked.
Responsibility for manhole covers is one of the following departments: Johannesburg Road Agency (JRA). JoBurg Water, Telkom and others. In my case I initially submitted my claim to JRA and was later advised that it should be JoBurg Water. The small covers generally where your left hand wheels travel near the kerb are valve chambers. In recent years the old metal covers that were stolen or broken have been replaced with a composite blue material - fibre reinforced concrete- that have failed dismally. The tyre markes on the tarmac shown on the attaced picture indate many such problems. Incedently 6 months later the cover remains broken
I drove over this one in Mountain View and not only did it break the bolt mentioned above but the end of the spring/shock landed on the drive shaft resulting in major damage- broken side shaft, damaged CV and shock absorber- some R 12000,00!
The procedure for submitting a claim is as follows:
- The claim form is available on-line from JRA web site- and send to Bonolo Ramohlala (bramohlala@jra.org.za) They list the documents that are required.
- In respect of JoBurg Water - the contact is Reon Coetzee tel 011 988 1441 Reon Coetzee.
I prepared a fully substantiated claim with the following:
- Completed claim form
- 3 quotes
- An invoice for the repairs and a receipt reflecting my payment
- Colour photographs of the damage
- A Google Earth picture of-can you believe! -the missing cover.
- A Google map of the location
- A letter from my insurers stating that I would not be lodging a claim with them. (since I was covered I could have claimed from my insurers but that would increase my monthly premium, affect the no claim bonus etc.)
- An affidavit stating that the car was damaged by the missing/broken manhole cover. A standard form for an affidavit of this nature is available from your local police station but also now available on our web site
All this was delivered to them by hand in a bound document with a copy of the covering letter that was signed for acknowledging receipt. I was given a reference number. One need lots of patience and a weekly follow up quoting the reference number. In my case the claim was submitted in April and settlement finally received in October. In the first sentence I mentioned past experience- Some years ago Michel had a similar problem with an unmarked trench in the road that was settled by JRA.
Cool MG
By: Boytjie
Overheating is an ongoing (and expensive) problem for our cars …. The original cooling system simply cannot cope in modern day traffic and with modern fuels which burn hotter. …. They were not designed to run in ambient temperatures that we experienced in S.A. ...(especially in summer)
I thought there may be some member’s interest in the modifications I have done to my MGA, E-Type and Healey. …Adopting these modifications, one can be assured that driving your car hard on a warm summer's day, or sitting in traffic, will never be a problem again.
Please accept that the views expressed here are my personal opinions.
For the analytically minded who need to question the technical reasons why all these mods are necessary… the major factors that influence the temperature of the engine are:
- The ambient temperature ...
- The capacity of the radiator ... (too often the standard engine is modified by increasing capacity or "breathing mods" which all means burning more fuel, but the radiator capacity is not increased)
- The air flow through the radiator.
- The rate of water flow through the radiator.
- The water pressure in the radiator.
- The air fuel ratio (rich or lean)
- The spark advance (timing)
- And often overlooked .... The air flow through the engine compartment.
Some other hidden facts that affect the engine temperature may be of interest, this is especially so when trying to understand the reason why it is so important to control engine temperature and avoid overheating "at all costs" .
Firstly, the engine relies on the conversion of fuel into heat, and then into mechanical energy to produce power. Only about one third of this heat is converted into power; another third is eliminated through the cooling system... Therefore it is essential to ensure that the cooling system is operating efficiently
If the engine temp is allowed to go to too high (around 80 deg. C is ideal) it will follow that the oil temp will increase which could lead to excessive oxidation, excessive wear and possible permanent damage (ever heard of cracked or warped cylinder heads?) .... Conversely, excessive engine wear occurs if the engine is run below 70 deg C for long periods, and calls for more frequent oil changes... So about that thermostat ? ... More later.
It seems obvious that the elementary basics must be dealt with before going to all the trouble of carrying out, and modifying the cooling system ...
- As a priority, ensure that the cylinder head and block have been chemically cleaned to remove 50 years of iron oxide-rust (a deposit of twelve thousands of an inch thick will cut heat transfer up to 40 %
- The timing is set correctly.
- The air / fuel ratio is set correctly
Many of our old gauges do not tell the whole truth, (check em) also remember no matter what the gauge tells you, the actual temp around the combustion chamber is far higher. It is also true that after switching off the temp will increase dramatically due to loss of water circulation, hence the reason why we have to pressurize the system .... to avoid water loss, due to internal temperatures going well above 100 deg C which is inevitable after switching off. (heat soak)
There is a good argument as to where the sender unit for the temp gauge should be fitted,... in the cylinder head or on the top of the radiator ?
Now to the modifications :
I am not going to get into trouble or into an argument about changing the originality of our classics. ... Fact is, I like to use my cars at any time and not limited by fear of overheating....... If necessary one can always take off the "workable mods" and put on the original parts before the meetings, the mods can always be refitted (ASAP) after the critics have left.
Taking the basics into consideration;
- The ambient temp... Not much to do
- The capacity of the radiator ..... The MGA is fitted with a 3 row copper core, I fitted a 5 row "new generation" core to the original radiator bracket/frame (Silverton) ... Only change required is to cut approx 50 mm out of the bottom shroud , (the new rad. is slightly tilted)
- The air flow through the radiator ....... I fitted a ‘flat motor’ Ford fan on the inside (pulling) ... I personally do not like those "Twisted blade cheapies".... The fan is controlled by a relay fed via a thermo switch (fitted in the cylinder head) which comes on at 85 deg. C and off at 75 deg.(Also remember to seal the area behind the grill to ensure that ALL the air coming in, flows through the radiator).
- The water flow through the radiator .... I fitted a Davies Craig electrical water pump, which means the mechanical pump is machined off, the impeller shaft and fan removed … Only the housing is retained .. (This gives you space for the electric fan). The electric pump is fed via a relay which is switched on from the ignition switch... giving the option to switch the pump on again after shut down, (to avoid the inevitable overheating, caused by “heat soak” Davies Craig also supply a controller that will allow run on for 2 minutes after switch off)... the fan will come on automatically if the temp is over 85 deg. C.... And yes, keep the thermostat if you are not disciplined to warm the engine by prolonged idle after first start-up.
- Pressure in the radiator .... I fitted a "outer sealing" radiator cap (the one without the spring) on the radiator and a 6 mm hose (inner diameter) is connected from the overflow outlet on the radiator to a small header tank (taken from the older Range Rover/ 110 Landy and fitted higher than the cylinder block, against the bulkhead with pressure cap..... No more water loss!
- Consider directing the air entering via the inlet scoop (next to the radiator) towards the exhaust manifold, which will encourage taking the hot air, in the engine compartment, down and out . ... (Hence the reason why the E - type has those sexy louvers on the bonnet)
- I fitted a suitable alternator to cope with the additional power requirements .... V belt run directly off the crank pulley, (no more mechanical water pump).
A lot of the above is fairly elementary and nothing new, but it might just help members to "Use their cars without fear of overheating"

New Paragraph
We use cookies to ensure that we give you the best experience on our website. To learn more, go to the Privacy Page.